In a previous blog I provided an an example of the Microsoft Teams Meeting Lifecycle for a private internal meeting. In this post I’m sharing some video content I’ve created for a Channel Meeting scenario.
In addition to the Meeting Lifecycle, some of the key points this demonstration highlights are: Multi-Factor Authentication and Terms of Use applied to Guest Access, Integrated App Experiences and the Richer Meeting Privileges afforded to Guest users.
In my recent blog called My Teams Security Slide I called out support for Data Loss Prevention (DLP) Policies for Microsoft Teams. I think most IT Pros are very familiar with these native platform controls built into Microsoft 365 and may have already applied them to Microsoft Teams Chats and Channels.
One thing I always point out is these same polices will be applied during a Microsoft Teams Meeting to protect against accidental data loss from within the Meeting Chat. This short video demo provides an example use case:
So in the video above Joni invites Adele to a meeting in her Microsoft 365 tenant and is protected from erroneously sharing credit card information. But what happens when Joni is in a meeting that’s hosted in an external tenant?
I recently posted a short blog called My Teams Security Slide, which contained an overview of the security controls I associate with Microsoft Teams. One of the features I listed was “Sensitivity Labels for Content”, which for organisations concerned about data loss prevention is a way of classifying content and applying security policies.
So what does this has to do with a Teams Meeting?
Microsoft 365 Sensitivity Labels actually allow administrators to managed document permissions and Microsoft Teams will honour these. One of the net effects is that is that you can restrict the ability to share confidential documents during a Teams Meeting.
I created this video to demonstrate the resulting end user experience.
This is a great way to protect against accidental data loss during a Microsoft Teams share. But what about policing a Teams Meeting chat? I’ll talk about this in a future post.
A couple of the common questions that IT Pros raise when they are new to Microsoft Teams is, “how do I control Teams sprawl and how can I put some Governance controls into the Teams creation process”?
There are a lots of tools at an administrator’s disposal to answer both these questions, but one approach I personally like is to have some form of automated process to manage Microsoft Teams creation.
Over the last last couple of years I’ve delivered numerous training events on this topic. One of my favourite pieces of work is a lab in which Partners use a combination of a SharePoint list, the Power Platform and Graph API to build an automated process for Microsoft Teams creation. My latest iteration of the lab has been around for over a year and I’ve finally got around to creating a video demo. Check it out below:
If you want to have a crack at building this demonstration, you can download the lab guide from here – Lab Guide Download.
As I mentioned this piece of work is over 12 months old now, if I ever have some time to update it I would replace the SharePoint classification label with a Sensitivity label. One of the benefits of the new modern label is that you can also use it to control Guest Access.
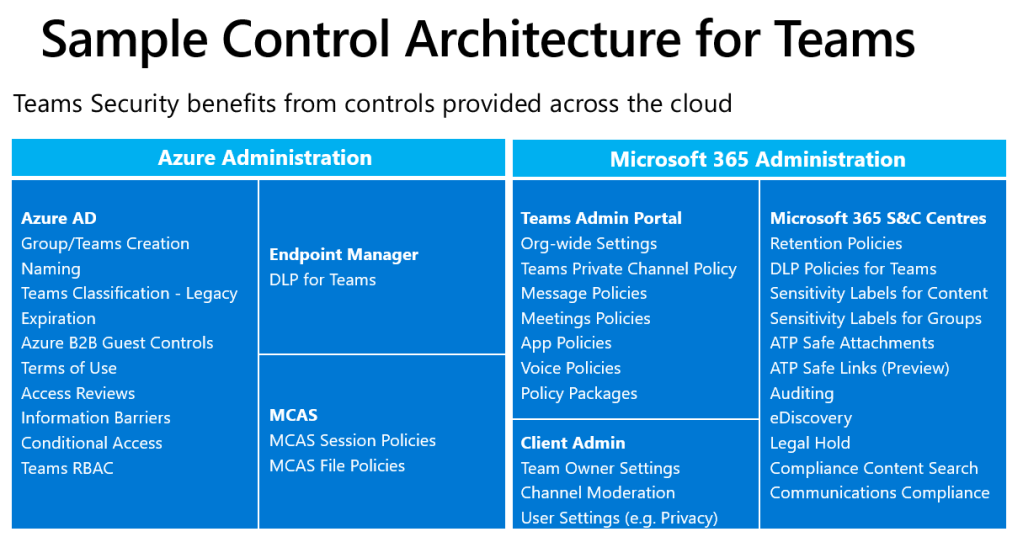
One of the things that I personally like about Microsoft Teams from an architect’s perspective is that the service leverages existing Microsoft 365 and Azure AD security capabilities. From an Admin’s perspective, the security features available for other Microsoft 365 services such as EXO and SPO are, when relevant, directly applicable to Teams.
Having said this, if you are new to Microsoft Teams you might struggle to get your head around which of the myriad of available controls relate to Teams and whether they fall under the Microsoft 365 or Azure AD administrative umbrellas. To try and help with this I recently created the diagram below to try and position a lot of the “bells and whistles” you might want to consider for a Teams security posture. One point to note is that different customers (or parts of a business) will have different security requirements. But I use this chart as a bit of a cheat sheet to remind me of some of the main components that should/could be considered during the planning stages of a Teams implementation.
Note; As per the slide name this is a “sample” of the capabilities so may not be exhaustive but it works for me as a super high level overview.
Anyway, just thought I’d post this in case this was helpful. I’ll probably bring some of the features mentioned above to life by way of some video demos in future posts.
For customers that need to manage their own on-net voice quality for Microsoft Teams, Direct Routing offers an option for Local Media Optimisation (LMO). The overarching principle is that by determining an end user’s location, when on the corporate network, the system will allow the voice path to be negotiated between the Teams client and the internal IP address of one of the customer’s (certified) SBCs. Hence, keeping the media within the customer’s domain, which allows QoS to be applied and honoured for PSTN calls.
Users who are roaming outside of the Enterprise network will establish a voice path with the public IP address of one of the corporate SBCs. Or via a Transport Relay Point if the customer’s security policy blocks direct inbound access to the SBCs.
Behind the scenes the Microsoft Teams platform uses a predefined virtual topology and “trusted IP addresses” to identify on a call by call basis whether the end user is either inside or outside of the corporate network. Depending on the location SIP X-MS headers will be used to tell the SBC where the Teams client is located.
This is an advanced configuration so I created the video demonstration below to help me explain the basic concepts. If this is a new area for you. I hope it helps!
For additional information, please check out the Microsoft documentation. After taking some time to review my video it should make for easier reading.
When the virtual Meeting Lifecycle concept was originally introduced it took me a while to get my head around how this would play out in real life. After going through my own personal learning curve a couple of years ago I’ve become a big fan.
Moving forward to 2020 I think it’s a perfect time to revisit this topic to ensure anyone using Microsoft Teams is taking full advantage of the “pre” and “post” meeting phases of the Lifecycle. Given the current state of the world a high proportion of meetings are now taking place online and I don’t think anyone wants to waste time during a call to handle tasks that could be dealt with offline and asynchronously.
One of the mantras I have is to try and keep remote meetings as short as possible and attempt to limit them to important interactions and decision making. If possible I try not to book back to back meetings. I expect most of us have experienced the machine gun meeting phenomenon and the subsequent stress of arriving late (and under prepared) for the next meeting. As a result I normally schedule 30-45 minute calls, which gives me some time to actually do some “in between” work and be punctual.
However, this is where the before and after sections of the Microsoft Teams Lifecycle come into their own. To be able to keep my meetings as short as possible, when appropriate, I will do some initial collaborative preparation and post real-time wrap up.
Once you get use to this way of working it’s really productive but new users may need help with the “Art of the Possible”. So I decided to create some videos that I use to demo the Lifecycle. In case it helps, I’ve shared one of them below:
If you know about virtual meeting tools then you have probably come across or used Live Events, which is the meeting broadcast solution that’s part of Microsoft Teams. It’s not entirely unexpected but I’ve seen a rapid rise in the use of Live Events over the last 6 months and I am actively working with Microsoft Partners to increase market capacity for this type of meeting in the UK.
When reading up on Live Events you may have come across external encoding? This is the ability to use 3rd party equipment to deliver studio quality production via the Teams Live Events client. I felt the documentation was a bit dry so I created the following demonstration video to provide a quick intro into this topic in under 4 minutes.
Hint – the encoder password shown in the video is a dummy one
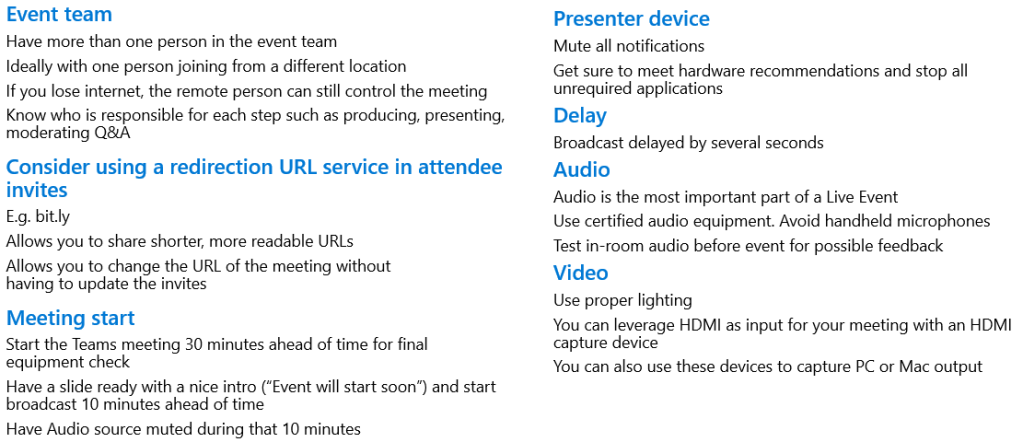
As you can see it’s actually not too hard to get started with the technology. However, I believe they key to delivering a professional looking event is actually creativity, preparation and practice, regardless of the encoding/production method you are using.
Just to finish off, here are a few tips and tricks that might be useful:
Microsoft is a leader in AI, which has definitely benefited Teams from an Accessibility standpoint. If you are familiar with Microsoft Teams you are probably already aware of the native in-meeting captions, translation and recording transcription services?
I recently created this video for some of my partner engagements so I could quickly and easily demonstrate some of the existing end user experiences.
The good news is that some additional AI driven Accessibility enhancements are in the pipeline. The two that I can talk about publicly are:
Live Captions with speaker attribution. Teams already provides live captions as a way to follow along with what is being said in the meeting, we’re also adding speaker attribution so captions will specify who is speaking.
Live Transcription with speaker attribution. Live transcripts provide another way to follow along with what has been said and who said it. After a meeting, the transcript file is automatically saved in the chat tab for that meeting.
If you are reading this post before these new features reach General Availability you can check their release status here.
The first and second articles in this series covered the configuration of basic telephony and voice polices for end users. This post provides some guidance on how to get started with Microsoft Teams Auto Attendants (AA) and Call Queues (CQ).
I expect if you’ve taken the trouble to navigate to this page you probably understand the basic concepts but if you are new to the topic you can find the Microsoft documentation by clicking on AA and CQ.
In the video demonstration below I take you through an Auto Attendant configuration that showcases most of the features available at the time of creation. I then configure a couple of call queues, which can be dialed directly or accessed via the AA’s IVR menu.
Note: The Microsoft Teams stack evolves rapidly and new features are added all the time. I believe this video is a great starting point to get a fundamental understanding of how to set up these organisational or department level voice services. Just be sure to still check out the documentation so you are aware of any updates Microsoft Engineering may have introduced. Change is a universal constant!