In my recent blog called My Teams Security Slide I called out support for Data Loss Prevention (DLP) Policies for Microsoft Teams. I think most IT Pros are very familiar with these native platform controls built into Microsoft 365 and may have already applied them to Microsoft Teams Chats and Channels.
One thing I always point out is these same polices will be applied during a Microsoft Teams Meeting to protect against accidental data loss from within the Meeting Chat. This short video demo provides an example use case:
So in the video above Joni invites Adele to a meeting in her Microsoft 365 tenant and is protected from erroneously sharing credit card information. But what happens when Joni is in a meeting that’s hosted in an external tenant?
I recently posted a short blog called My Teams Security Slide, which contained an overview of the security controls I associate with Microsoft Teams. One of the features I listed was “Sensitivity Labels for Content”, which for organisations concerned about data loss prevention is a way of classifying content and applying security policies.
So what does this has to do with a Teams Meeting?
Microsoft 365 Sensitivity Labels actually allow administrators to managed document permissions and Microsoft Teams will honour these. One of the net effects is that is that you can restrict the ability to share confidential documents during a Teams Meeting.
I created this video to demonstrate the resulting end user experience.
This is a great way to protect against accidental data loss during a Microsoft Teams share. But what about policing a Teams Meeting chat? I’ll talk about this in a future post.
When the virtual Meeting Lifecycle concept was originally introduced it took me a while to get my head around how this would play out in real life. After going through my own personal learning curve a couple of years ago I’ve become a big fan.
Moving forward to 2020 I think it’s a perfect time to revisit this topic to ensure anyone using Microsoft Teams is taking full advantage of the “pre” and “post” meeting phases of the Lifecycle. Given the current state of the world a high proportion of meetings are now taking place online and I don’t think anyone wants to waste time during a call to handle tasks that could be dealt with offline and asynchronously.
One of the mantras I have is to try and keep remote meetings as short as possible and attempt to limit them to important interactions and decision making. If possible I try not to book back to back meetings. I expect most of us have experienced the machine gun meeting phenomenon and the subsequent stress of arriving late (and under prepared) for the next meeting. As a result I normally schedule 30-45 minute calls, which gives me some time to actually do some “in between” work and be punctual.
However, this is where the before and after sections of the Microsoft Teams Lifecycle come into their own. To be able to keep my meetings as short as possible, when appropriate, I will do some initial collaborative preparation and post real-time wrap up.
Once you get use to this way of working it’s really productive but new users may need help with the “Art of the Possible”. So I decided to create some videos that I use to demo the Lifecycle. In case it helps, I’ve shared one of them below:
If you know about virtual meeting tools then you have probably come across or used Live Events, which is the meeting broadcast solution that’s part of Microsoft Teams. It’s not entirely unexpected but I’ve seen a rapid rise in the use of Live Events over the last 6 months and I am actively working with Microsoft Partners to increase market capacity for this type of meeting in the UK.
When reading up on Live Events you may have come across external encoding? This is the ability to use 3rd party equipment to deliver studio quality production via the Teams Live Events client. I felt the documentation was a bit dry so I created the following demonstration video to provide a quick intro into this topic in under 4 minutes.
Hint – the encoder password shown in the video is a dummy one
As you can see it’s actually not too hard to get started with the technology. However, I believe they key to delivering a professional looking event is actually creativity, preparation and practice, regardless of the encoding/production method you are using.
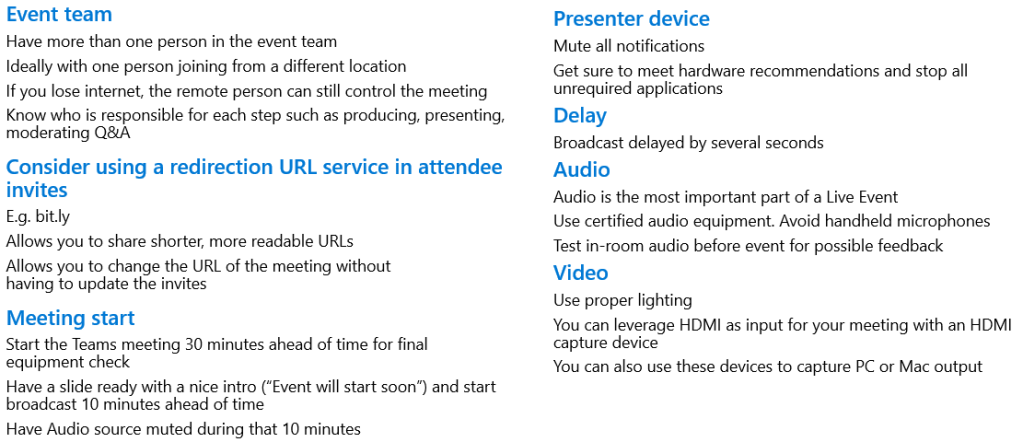
Just to finish off, here are a few tips and tricks that might be useful:
Microsoft is a leader in AI, which has definitely benefited Teams from an Accessibility standpoint. If you are familiar with Microsoft Teams you are probably already aware of the native in-meeting captions, translation and recording transcription services?
I recently created this video for some of my partner engagements so I could quickly and easily demonstrate some of the existing end user experiences.
The good news is that some additional AI driven Accessibility enhancements are in the pipeline. The two that I can talk about publicly are:
Live Captions with speaker attribution. Teams already provides live captions as a way to follow along with what is being said in the meeting, we’re also adding speaker attribution so captions will specify who is speaking.
Live Transcription with speaker attribution. Live transcripts provide another way to follow along with what has been said and who said it. After a meeting, the transcript file is automatically saved in the chat tab for that meeting.
If you are reading this post before these new features reach General Availability you can check their release status here.